Introduction to Websockets
May 29, 2020
In this blogpost I will be covering the basics of websockets by creating a website that allows users to paint on a canvas with other users in realtime. We won’t be using any frameworks in this post, just normal HTML, CSS and JavaScript with some Node.js for the websocket server.
Prerequisities
Before we get started it is assumed that you have a basic knowledge of HTML, CSS and JavaScript and have atleast heard of Node and the Node Package Manager (NPM)
Getting Setup
Create a folder somewhere on your computer:
mkdir intro-to-websocketsInside of that folder, create two more folders named client and server:
cd intro-to-websockets && mkdir client && mkdir serverFinally, inside of the client folder, create an index.html file and main.js file with the following content:
<!DOCTYPE html>
<html lang="en">
  <head>
    <meta charset="UTF-8" />
    <meta name="viewport" content="width=device-width, initial-scale=1.0" />
    <title>Intro To Websockets</title>
    <style>
      html,
      body {
        margin: 0;
        padding: 0;
        display: flex;
        flex-direction: column;
        align-items: center;
      }

      canvas {
        background-color: #333;
      }
    </style>
  </head>

  <body>
    <h1>Paint with Friends!</h1>
    <!--The <canvas> is what we will be drawing on-->
    <canvas width="800" height="600"></canvas>
    <script src="./main.js"></script>
  </body>
</html>
console.log("Hello World!");
Serving the files locally
During development our website will be communicating with a server (once we implement websockets) and the server will expect the communications to be coming from another server, and not a local file. This means we can’t just open our index.html file in the browser, instead we need to host the file via a local web server.
This can be done in many ways, one way is to use a node package called http-server. You will need Node.js installed for this to work. We’ll be using Node.js later anyway so you might as well install it now, you can do that here.
Once you’ve installed node, you’ll probably need to restart your terminal (You can check that node is installed by running node -v).
If node is sucessfully installed, you can use the http-server package by navigating to your client folder and running npx http-server -c-1, this will make your index.html file available when you visit http://localhost:8080 in your browser.
To make sure our JavaScript has loaded, open your console (F12) and make sure that “Hello World!” is being printed.
Implementing the clientside painting functionality
Before we even deal with websockets, we should implement the clientside functionality that allows a user to draw on the screen.
First, inside of the client/main.js file, start by grabbing the canvas element and the context required to draw to the canvas:
const canvas = document.querySelector("canvas");
const ctx = canvas.getContext("2d");
and then set the fill colour, that the canvas will use when we draw, to be a random colour from an array of colours.
const canvas = document.querySelector("canvas");
const ctx = canvas.getContext("2d");

const colours = [
  "#2ecc71",
  "#3498db",
  "#e74c3c",
  "#9b59b6",
  "#f39c12",
  "#ecf0f1",
];

const thisColour =
  colours[Math.floor(Math.random() * (colours.length - 1 + 1))];

ctx.fillStyle = thisColour;
Finally, we store whether the mouse is being clicked by setting isMouseDown to true when the “mousedown” event is triggered and false when the “mouseup” event is triggered.
Then, inside of a “mousemove” event listener, we check if the mouse is currently being clicked and if it is, we draw a rectangle onto the canvas at the current position of the mouse with a width and height of 15:
const canvas = document.querySelector("canvas");
const ctx = canvas.getContext("2d");

const colours = [
  "#2ecc71",
  "#3498db",
  "#e74c3c",
  "#9b59b6",
  "#f39c12",
  "#ecf0f1",
];

const thisColour =
  colours[Math.floor(Math.random() * (colours.length - 1 + 1))];

ctx.fillStyle = thisColour;

let isMouseDown = false;

canvas.addEventListener("mousedown", () => (isMouseDown = true));
canvas.addEventListener("mouseup", () => (isMouseDown = false));

canvas.addEventListener("mousemove", e => {
  if (isMouseDown) {
    ctx.fillRect(e.offsetX, e.offsetY, 15, 15);
  }
});
Refresh your browser and try drawing on the canvas to make sure everything works.
Setting up a Websocket Server
The general idea
Setting up a websocket server isn’t overly complicated, but can be confusing if you don’t understand how websockets work so let’s first cover the basics of websockets and then setup a simple server using Node.js.
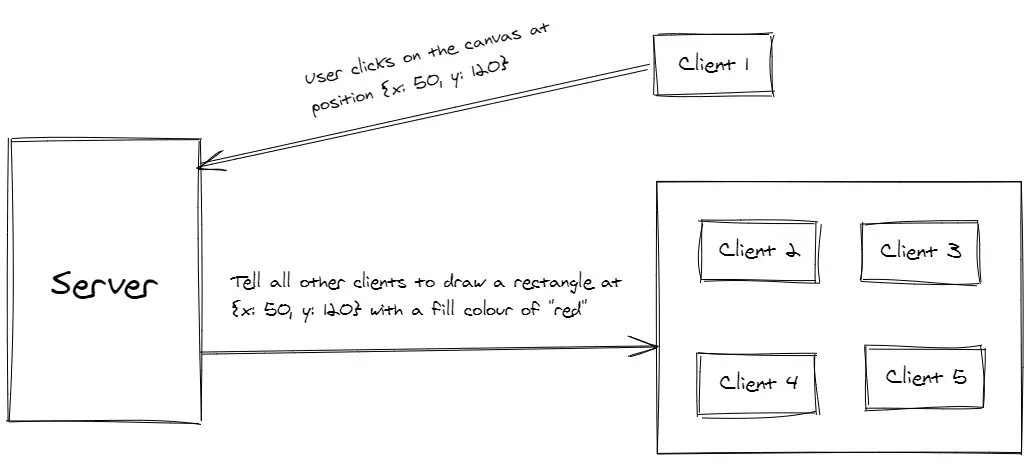
When using websockets, it is key to understand that the clients don’t directly talk to other clients, rather they have a persistent connection with the server through which they can send and receive messages. The server can then forward their messages onto all of the other clients that are connected.
Each client can then listen for a message from the server and then do something in response to it. In the context of our website, when our user draws a rectangle on the canvas, we will tell the server where that rectangle has been drawn and then the server will relay that to all of the other clients who will then draw the same rectangle on their canvases.
By default, when a client connects to the websocket server, they send a “connection” message, the clients can then send any messages to the server and the server can also send messages to the client.
The Code
Let’s start by setting up the server. For the server we will be using Node.js and a node implementation of the underlying websocket protocol called ws, for the clientside (which we will get to later on) we will be using websockets that are native to the browser.
Before getting started, make sure you have Node.js installed if you didn’t do it earlier.
Start by navigating to the server folder in your terminal and run
npm init -ywhich allows us to install local node packages using the Node Package Manager (NPM). *You’ll need to stop your web server or open a new terminalNext, run
npm install wsto install the ws package.
The ws package is now a package that our project depends on, you can see this in your package.json.
"dependencies": {
    "ws": "^7.3.0"
  }
Next, create a main.js file inside of the server folder, this will hold the code for our server. Write the following inside of it:
const http = require("http");
const WebSocket = require("ws");

const server = http.createServer();
const WebSocketServer = new WebSocket.Server({ server });

WebSocketServer.on("connection", ws => {
  console.log("New Connection");
});

server.listen(1234);
First we import the node.js http module which allows us to start a web server and then we import the ws module we installed earlier:
const http = require("http");
const WebSocket = require("ws");

const server = http.createServer();
const WebSocketServer = new WebSocket.Server({ server });

WebSocketServer.on("connection", ws => {
  console.log("New Connection");
});

server.listen(1234);
Next we use the http module to create and then start a http server on port 1234:
const http = require("http");
const WebSocket = require("ws");

const server = http.createServer();
const WebSocketServer = new WebSocket.Server({ server });

WebSocketServer.on("connection", ws => {
  console.log("New Connection");
});

server.listen(1234);
finally, we use the ws module to create a WebSocket server that sits on top of the http server we just created and then we add a listener that will be triggered when a client connects to it.
const http = require("http");
const WebSocket = require("ws");

const server = http.createServer();
const WebSocketServer = new WebSocket.Server({ server });

WebSocketServer.on("connection", ws => {
  console.log("New Connection");
});

server.listen(1234);
and that’s it for a basic websocket server. In the next section we’ll write the code that allows clients to connect to it.
Setting up a Websocket Client
So now we’ve got a server, all that’s needed is just one line of code to connect to the server.
At the top of your client/main.js file, put the following:
const socket = new WebSocket("ws://localhost:1234");
This line of code connects the client to the server that is at ws://localhost:1234. You might be thinking that this looks like a regular URL, and that’s because it is similar, the only difference is that instead of using the http protocol, we are using the ws (websocket) protocol which enables two-way communication between a client to a remote server. Similarly to https, there is a wss protocol which we’ll cover later on.
Run your server by navigating to the server folder and running node main.js.
If you stopped your client http-server earlier you can restart it by running npx http-server -c-1 inside of the client folder. You’ll need to do this in a seperate terminal from the one running your server.
Now, when you visit your client on http://localhost:8080 you should see “New Connection” printed out into the terminal that is running the server.
That’s all you need to setup a client -> server connection.
Sending Messages from the Client to the Server
Let’s add some code to our server that listens for messages from the clients.
In the server/main.js file, add the following to the WebSocketServer.on listener:
WebSocketServer.on("connection", ws => {
  console.log("New Connection");

  ws.on("message", message => {
    console.log(message);
  });
});
This will, when a client connects, add a listener that listens for if they send a message to the server, it will then just console log whatever that message is.
Now on the client we can write some code that sends a message to the server when the user clicks their mouse.
Modify the existing event listener:
canvas.addEventListener("mousedown", () => {
  isMouseDown = true;

  socket.send("Client is clicking their mouse!");
});
and then restart your server (by cancelling the process and running node main.js in the server folder)
Visit http://localhost:8080, refresh the page, and then click anywhere on the page. If you look at the terminal that is running your server (the one you ran node main.js in), you should see “Client is clicking their mouse!” being printed out.
If you put the terminal and browser side by side and then click, you can see this work in realtime.
Making it a bit more realistic
So we can tell the server that we’re clicking, is there any limit to our power?
Let’s make it a bit more realistic to our use case by telling the server that we’re drawing, and let it know where we are drawing on the canvas and what colour we are.
In the client/main.js file, first remove the socket.send we wrote above.
Then, inside of the “mousemove” event listener, add the following code:
canvas.addEventListener("mousemove", (e) => {
  if (isMouseDown) {
    ctx.fillRect(e.offsetX, e.offsetY, 15, 15);

    socket.send(
      JSON.stringify({
        x: e.offsetX,
        y: e.offsetY,
        colour: thisColour,
      });
    );
  }
});
This sends a string of JSON to the server whenever we draw on the canvas, this string just tells the server where on the canvas we drew (x, y) and what the colour of our client is.
Now, in the server code, we can edit our message listener to print out the more detailed message:
WebSocketServer.on("connection", ws => {
  console.log("New Connection");

  ws.on("message", message => {
    const { x, y, colour } = JSON.parse(message);

    console.log(`Client is drawing at (${x}, ${y}) with the colour: ${colour}`);
  });
});
Here we just parse the JSON so it can be used as a normal JavaScript object, we then destructure the object to pull out all of the values so that they can be logged to the console.
If you restart your server and refresh your browser, when you start drawing on the canvas, the terminal that is running your server should be logging all of the relevant information about what is being drawn.
Receiving Messages from the Server
We almost have multiplayer drawing implemented. The next step is to, when the server gets a message from a client, tell all of the other clients about it so that they can use that data to draw on their own canvas.
Let’s update the server code so that we do two things:
Firstly, everytime a client connects to our server, we should store it inside of an array.
let clients = [];

WebSocketServer.on("connection", ws => {
  console.log("New Connection");

  clients.push(ws);

  ws.on("message", message => {
    const { x, y, colour } = JSON.parse(message);

    console.log(`Client is drawing at (${x}, ${y}) with the colour: ${colour}`);
  });
});
Secondly, whenever we receive a message from a client, we should send it to all of the other clients:
WebSocketServer.on("connection", ws => {
  console.log("New Connection");

  clients.push(ws);

  ws.on("message", message => {
    clients.forEach(client => {
      if (client !== ws) {
        client.send(message);
      }
    });
  });
});
Here we’re just looping through our array of clients, and sending the message along to every client that isn’t the client that actually sent the message.
In the next section we will add a listener on the client that will react to this message by drawing it to the canvas.
Drawing Networked Data to the Canvas
In the client/main.js file (somewhere at the top-level of the file), add the following code:
socket.onopen = e => {
  if (socket.readyState === WebSocket.OPEN) {
    socket.onmessage = message => {
      const { x, y, colour } = JSON.parse(message.data);

      ctx.fillStyle = colour;
      ctx.fillRect(x, y, 15, 15);
      ctx.fillStyle = thisColour;
    };
  }
};
Here we are adding a listener to our socket, first to check if it has connected to the server sucessfully, and then for if it has received a message.
We then destructure the data from the message, and then draw to the canvas using it.
That’s it!
Restart your server and refresh your browser, make sure to open two tabs (side by side if possible) and start drawing, you should see the result on both tabs at the same time!
Housekeeping
Right now, if a client disconnects from the server, we still store them inside of the clients array in server/main.js. This isn’t an issue for this use case, but it is always good to clean up after ourselves.
We can do this easily as, when a websocket disconnects, it sends a “close” message to the server. Let’s use this to remove it from the array in the same place we have our .on("message") listener:
ws.on("close", () => {
  clients = clients.filter(client => client !== ws);
});
This just loops through the clients array, and filters it so that only the clients that aren’t our client that just disconnected are returned.
Some things to be aware of
Dealing with broken connections
Although for this simple example it doesn’t matter, sometimes the link between the server and the client can be interrupted with both of them being unaware of the broken connection. The way to combat this is to use something called a heartbeat which periodically pings the client and expects a pong in return which verifies that it is still connected (or alive if you prefer). You can read more on how to implement this here.
Maintaining state across connections
Another gotcha that we didn’t account for is a client disconnecting and then reconnecting when a session has already started. In its current state nothing will break, but if any of the clients have drawn on the canvas, any new clients (or rejoining clients) won’t be shown the existing drawings.
This may or may not be your desired functionality, but a possible solution would be to store a queue of actions on the server and, every time a client sends a message, add it to the queue. Then, when a new/rejoining client connects, send them the queue so that they can draw everything on their canvas and get up to date; I’ll leave it up to you to implement a solution to this problem.
Working over a secure connection (https)
Finally, on the client we are currently connecting to the websocket server by writing ws://localhost:1234 and it all works as expected. However this only works as our websocket server is on an unsecure connection (http). If our server was using https we would need to update the url to be wss://localhost:1234.
It is important to be aware of this as if you decide to host your server on something like heroku, it will default to https.
Conclusion
Thanks for reading, I hope this blogpost gave you a good, practical, introduction to websockets. There is much more to them, but this should be enough to get started. If you want a more comprehensive solution to websockets, there are libraries like socket.io.